Saturday, June 30, 2018

Ritz Cracker Chocolate Peanut Butter Cookies


These Ritz Cracker Chocolate Peanut Butter Cookies are my favorite Christmas cookies. I lie. I can’t choose a favorite. But they are the ones I tend to instinctively grab the most. The mixture that you dip the peanut butter cracker sandwiches in is a perfect balance of milk/dark chocolate, white chocolate, and butterscotch chips. I think it’s the butterscotch chips that provide that extra something that keeps me coming back. Although subtle, it pairs so well with the peanut butter.

I’m continuing with the frozen no-bake desserts to help you prepare for the holiday season. There is another Ritz Cracker recipe after this one before I switch over to baked cookies. Both Ritz Cracker cookies are addicting and super easy but this one is definitely the richer of the two (the other one is really easy to pop in your mouth like popcorn). The most time intensive part is dipping each cookie into the chocolate. But biting into the thin but crisp chocolate coating, crunchy cracker, and creamy hardened peanut butter is totally worth it.

INGREDIENTS
  • 60 Ritz Crackers
  • Creamy peanut butter
  • 12 ounces milk or dark melting chocolate
  • 8 ounces white melting chocolate
  • 6 ounces butterscotch baking chips
INSTRUCTIONS
  1. Make peanut butter sandwiches with two Ritz Crackers and peanut butter.
  2. Melt the milk/dark chocolate, white chocolate, and butterscotch baking chips together in a double boiler.
  3. Dip sandwiches in melted mixture and put on a cookie sheet. Once the sheet is full, place it in the freezer until the cookies are frozen.
  4. Store in a zip lock bag in the freezer.

Blueberry Oatmeal Crumble Bars


These blueberry oatmeal crumble bars are bursting with juicy blueberries, and filled with crunchy oatmeal crumble. They can be made with fresh or frozen blueberries, and the oatmeal mixture doubles as the base and crumble topping.  Delicious for breakfast or dessert – you’ll love this easy recipe!

For the blueberry filling we’re using blueberries, lemon juice, a little sugar and some cornstarch. You can use fresh or frozen berries, however the bake time will be a little longer if using frozen berries.

These blueberry oatmeal crumble bars are full of texture and packed with juicy berries. I love making these for dessert and then having the leftovers for breakfast.

INGREDIENTS

For the Base & Crumble Topping
  • 1 cup all-purpose flour
  • 3/4 cup old-fashioned oats , or large flake oats (not quick oats or instant oats)
  • 1/2 cup granulated sugar
  • 1/4 cup packed brown sugar
  • 1/2 teaspoon cinnamon
  • 1/4 teaspoon salt
  • 1/2 cup unsalted butter , melted
  • 1 large egg yolk
  • 1 tablespoon packed brown sugar
For the Blueberry Layer
  • 2 cup blueberries , fresh or frozen - see baking time adjustment if using frozen
  • 2 tablespoons lemon juice , freshly squeezed (use 1 tablespoon if using frozen berries)
  • 1/4 cup granulated sugar
  • 2 teaspoons cornstarch
INSTRUCTIONS
  1. Preheat the oven to 350F degrees. Line an 8x8 baking pan with aluminium foil and grease with non-stick cooking spray.
  2. In a medium bowl whisk together the flour, oatmeal, granulated sugar, 1/4 cup brown sugar, cinnamon, and salt. Gently stir in the melted butter & egg yolk. 
  3. Remove 1 cup of the mixture.
  4. Press the remaining mixture into the bottom of the prepared pan. 
  5. In a medium bowl mix together all the ingredients for the blueberry layer. Spoon over top of the base oatmeal cookie mixture in the pan. 
  6. To the reserved 1 cup of oatmeal mixture, stir in the 1 additional tablespoon of brown sugar. Crumble the mixture over top of the blueberry layer. I like to form big crumbles by squeezing it in my fist. 
  7. Please visit Blueberry Oatmeal Crumble Bars for full instructions

Simply Perfect Chocolate Cake


This is THE BEST chocolate cake recipe out there!  Easy, one-bowl recipe, moist and melt-in-your-mouth, with tons of deep chocolate flavor! 

This is something I have been meaning to share for a long time!  My chocolate cupcake recipe is one of the top posts on this site, and readers are always asking me if it can be done as a cake too.  So here it is (finally!): Simply Perfect Chocolate Cake.

Well, my hard work paid off because that is one of the most popular recipes on my site to this day.  There are tons of comments on it, from readers who tried and and LOVED it.  Many of them say it’s the only chocolate cake they will ever make again!

INGREDIENTS

For the chocolate cake layers
  • 1 1/2 cups granulated sugar
  • 1 cup all-purpose flour
  • 1/2 cup cake flour
  • 1 cup unsweetened cocoa powder
  • 1 1/2 teaspoons baking powder
  • 1 teaspoon baking soda
  • 1/2 teaspoon kosher salt
  • 1 cup (2 sticks) unsalted butter, softened
  • 4 large eggs
  • 1 cup plain Greek yogurt or sour cream
  • 2 teaspoons vanilla extract
For the cocoa simple syrup (optional)
  • 1/2 cup granulated sugar
  • 1 tablespoon unsweetened cocoa powder
  • 1/2 cup water
For the chocolate Swiss meringue buttercream
  • 6 large egg whites
  • 2 cups granulated sugar
  • 2 cups unsalted butter, softened but still cool
  • 10 ounces semi-sweet chocolate, melted and cooled slightly
  • 2 1/2 tablespoons water
  • 2 tablespoons unsweetened cocoa powder
  • 1 teaspoon vanilla extract
  • 1/4 teaspoon kosher salt
INSTRUCTIONS

To make the chocolate cake layers:
  1. Preheat the oven to 325 degrees F.
  2. Generously mist three 8-inch diameter by 3-inch high cake pans with non-stick spray, and line with circles cut from parchment paper.
  3. Place the sugar, flours, cocoa, baking powder, baking soda, and salt in a large mixing bowl, and whisk to combine.
  4. Cut the butter into smaller pieces and add it to the dry ingredients.
  5. Mix on low speed until the mixture resembles damp sand (30 seconds to a minute).
  6. Add the eggs, one at a time, scraping the bottom and sides of the bowl with a silicone spatula after each addition.
  7. When all of the eggs are fully incorporated, add the Greek yogurt or sour cream and vanilla, and beat on medium speed for about 60 to 90 seconds, to aerate the batter and strengthen the cake's structure.
  8. Please visit Simply Perfect Chocolate Cake for full instructions

Chewy Ginger Molasses Cookies


These cookies have been my absolute favorite cookies to make each holiday season since I first learned how to bake.  And as such, they were actually the very first cookie recipe I posted on this blog back in 2009.  So since the recipe tends to get buried in the archives, I thought I would pull it back up today to share with any of you other molasses cookie lovers.  Because trust me — it is a winner.

It’s easy to make, and creates the softest chewiest ginger molasses cookies ever.  Our family always just rolled the dough in traditional granulated sugar.  But if you want to get fancy, you can roll it in some more coarse turbinado sugar, or you can even experiment with other various sugars.

INGREDIENTS
  • 1 ½ cups butter, softened to room temperature (not melted!*)
  • 2 cups granulated sugar
  • ½ cup molasses
  • 2 eggs
  • 4 cups all-purpose flour
  • 4 teaspoons baking soda
  • 2 teaspoons ground cinnamon
  • 2 teaspoons ground ginger
  • 1 teaspoon ground cloves
  • 1 teaspoon salt
INSTRUCTIONS
  1. Preheat oven to 375°F.
  2. In a medium bowl, whisk together flour, soda, cinnamon, cloves, ginger and salt. Set aside.
  3. In the bowl of an electric stand mixer, beat together butter and sugar on medium speed for 2 minutes until light and fluffy, scraping down the bowl if need be.  Mix in the eggs (one at a time) and molasses, and beat on medium-low speed until each is combined. Gradually add in the dry ingredient mixture and beat until combined.
  4. Place a sheet of plastic wrap directly on top of the dough (so that it’s touching the entire surface and preventing air from getting in) to completely cover it.  Then refrigerate dough for 30-60 minutes, until it is completely chilled.
  5. Please visit Chewy Ginger Molasses Cookies for full instructions.

Banana Bread Bars with Browned Butter Glaze


These delicious, soft, moist banana bread bars may be my favorite way to use ripe bananas! Bananas are a hot commodity in our house! I love them every morning sliced in my cereal, yogurt or on top of my peanut butter toast.

My kids would eat as many bananas a day as I would let them, and Jeff takes half of a banana with him on his way to work every morning.

These little bars are insanely good. They are super moist and the “bread” part tastes almost more like cake. It’s to die for. Also, I’m pretty sure I would eat anything that was smothered in this delicious browned butter frosting.

If I make these in a jelly roll pan I like to cut them in big squares, like a sheet cake. I’ve also made them many times in a 9×13” pan. They’re much thicker that way, but equally as delicious, and I like to cut them into small squares to make cute little snack bites.

INGREDIENTS

For the Banana Bread Bars:
  • 1-1/2 cups sugar
  • 1 cup plain Greek yogurt or sour cream
  • 1/2 cup butter softened
  • 2 eggs
  • 3-4 ripe bananas mashed
  • 2 tsp vanilla extract
  • 2 cups all-purpose flour
  • 1 tsp baking soda
  • 3/4 tsp salt
For the Brown Butter Glaze:
  • 6 Tbsp butter
  • 3 cups powdered sugar
  • 1 tsp vanilla extract
  • 2 Tbsp milk
INSTRUCTIONS

Preheat oven to 375 degrees F and grease a 15x10-inch jelly roll pan, or a 9x13’’ pan (depending on if you want thin “sheet cake” style bars or thicker bars).

For the bars:
  1. In a large bowl, cream together the sugar and butter. Beat in the sour cream and eggs, bananas and vanilla extract.  
  2. Add the flour, baking soda, salt, and mix just until moistened. Stir in walnuts, if using.
  3. Spread batter evenly into greased pan.  For a jelly roll pan, bake for 18 to 23 minutes or until a toothpick inserted in the center comes out clean or with few crumbs. For a 9x13’’ pan, bake for 23-28 minutes or until a toothpick inserted in the center comes out clean or with few crumbs.
  4. Please visit Banana Bread Bars with Browned Butter Glaze for full instruction.

Friday, June 29, 2018

Bakery Style Chocolate Chip Cookies


Bakery Style Chocolate Chip Cookies are crispy, chewy and soft. They have a ton of delicious flavor due to adding extra vanilla, salt and brown sugar. This is my go-t0 recipe for my favorite!

If they’re chocolate chip. Well…I take that back. Cookies are my thang, one of my favorite sweet indulgences and one of my very favorite desserts to make. So yes. I could eat all the cookies in the world. What’s your favorite sweet treat?

Chocolate chip cookies are easily my favorite, which is why I am so ecstatic about this bakery style chocolate chip cookie recipe! These are one of my best cookie recipes ever and I have made quite a few!

INGREDIENTS
  • 2½ cups all-purpose flour (add an additional ¼ cup if dough seems too sticky)
  • 1 teaspoon baking soda
  • ¼ teaspoon baking powder
  • 1 teaspoon salt
  • 1 cup (2 sticks) unsalted butter, room temperature
  • ½ cup granulated sugar
  • 1 cup packed brown sugar
  • 2 teaspoon pure vanilla extract
  • 2 large eggs, room temperature
  • 2 cups chocolate chips (I used semi-sweet)
INSTRUCTIONS
  1. Preheat oven to 375 degrees and line a baking sheet with parchment paper or a baking mat.
  2. In a medium bowl, mix dry ingredients - flour, baking soda, baking powder, and salt; set aside.
  3. In a stand alone mixer fitted with a paddle attachment (can use hand held too), cream together butter and granulated sugar and brown sugar. Add vanilla and eggs one at a time and mix, scraping down sides of bowl as necessary. Mixture may look lumpy.
  4. With the mixer on low-speed, slowly add the bowl of dry ingredients and mix just until dough comes together, it may be a little crumbly which is totally fine! You do not want to over mix the dough, otherwise the cookies can flatten when baked.
  5. Lastly, mix in chocolate chips. Place dough in refrigerator for 30 minutes - 1 hour to firm up. Dough will be pretty firm already, but I find that cooled dough bakes better. If the dough is too warm or sticky, the cookies may flatten out.
  6. Please visit Bakery Style Chocolate Chip Cookies for full instructions.

White Chocolate Reese’s Pieces Peanut Butter Chip Cookies


Soft and chewy cookies loaded with white chocolate, Reese’s pieces, and peanut butter chips! So much Y-U-M.

For these cookies you’re also going to need to get your hands on white chocolate chips, peanut butter chips, and Reese’s pieces. I used the mini Reese’s pieces (they’re so cute), but full-sized will work too.

Make today’s White Chocolate Reese’s Pieces Peanut Butter Chip Cookies for all your Fall festivities! They will definitely be making an appearance at our Halloween party… and you know I’m packing a few for our flight on Saturday. You can never have too many cookies in your life. ♥♥♥

INGREDIENTS
  • 2 1/2 cups all-purpose flour
  • 1 teaspoon baking soda
  • 1/2 teaspoon salt
  • 2 sticks (8 ounces) unsalted butter, at room temperature
  • 1 cup + 2 tablespoons light brown sugar, packed
  • 1/2 cup granulated sugar
  • 2 teaspoons vanilla
  • 2 large eggs, at room temperature
  • 1 cup white chocolate chips
  • 1 cup peanut butter chips
  • 1/2 cup Reese's Pieces (I used the minis but full-sized are OK, too)
INSTRUCTIONS

  1. Preheat oven to 375 degrees (F). Line 2 large baking sheets with parchment paper and set aside. In a medium sized bowl whisk together the flour, baking soda, and sea salt; set aside.
  2. Add the sugars, vanilla, and butter to a large bowl and whisk until light and fluffy; about 2 minutes (I recommend using a stand mixer/ handheld mixer to help here, if you have one). Add the eggs and beat quickly – for only about 30 seconds – until they’re just combined. Let the mixture rest for 5 minutes, then beat the eggs for another 30 seconds. Gently fold in the flour mixture with a rubber spatula, stirring only until the flour begins to disappear. Fold in white chocolate, peanut butter chips, and Reese's Pieces.
  3. Please visit White Chocolate Reese’s Pieces Peanut Butter Chip Cookies for full instructions.

Pumpkin Spice Cookies with Cinnamon Cream Cheese Frosting


These Pumpkin Spice Cookies with Cinnamon Cream Cheese Frosting are cookies from Nancy and my childhood.  They are made with love from our mom’s decades old recipe and taste like a bite of the Holidays.  Cake-y and pumpkin-y with a smear of sweet cream cheese frosting these are a great cookie to make for Thanksgiving, Christmas or especially a Christmas Cookie Exchange.

These cookies are very good. Light and fluffy and filled with the taste of the holidays.  They remind me of my mom and I love them! They would be a fun cookie to bring to a cookie exchange party or a Christmas party.

INGREDIENTS

Pumpkin Spice Cookies:
  • 1/2 Cup Butter (Sweet Cream Salted)
  • 1 Cup Sugar
  • 2 Eggs
  • 1 Cup Canned Pumpkin
  • 2 Cups Flour
  • 4 tsp. Baking Powder
  • 1 tsp. Salt
  • 2 1/2 tsp. Cinnamon
  • 1/2 tsp. Nutmeg
  • 1/4 tsp. Ginger
  • 1 Cup Chopped Walnuts or Pecans (optional)
  • Cookie Sheets
  • Parchment Paper
Cinnamon Cream Cheese Frosting:
  • 1/2 Cup Butter (Sweet Cream Salted)
  • 8 oz. block of Cream Cheese
  • 3 tsp. Vanilla
  • 4 cups Powdered Sugar
  • 1 tsp. Cinnamon
INSTRUCTIONS

Pumpkin Spice Cookies:
  1. In a mixer cream the butter and sugar until light and fluffy.
  2. Add eggs and pumpkin and mix well.
  3. Sift flour, baking powder, salt and spices together and fold into cookie batter.
  4. Mix until well blended.
  5. Drop a spoonful of the cookie batter onto a cookie sheet.
  6. Bake in a 350 degree oven for approximately 15 minutes.
  7. Please visit Pumpkin Spice Cookies with Cinnamon Cream Cheese Frosting for full instructions.

Triple-Layer Cracker Toffee Bars


These easy caramel and chocolate layered cracker toffee bars are a twist on a traditional cracker toffee.

INGREDIENTS
  • 90 buttery rectangular crackers (from 13.7-oz box)
  • 1 can (14 oz) sweetened condensed milk (not evaporated)
  • 1 cup packed brown sugar
  • 1/2 cup butter
  • 1/4 cup milk
  • 1 bag (11.5 oz) milk chocolate chips (2 cups)
INSTRUCTIONS
  1. Line 13x9-inch pan with foil. Spray foil with cooking spray. Place 30 of the crackers in bottom of pan.
  2. In 2-quart saucepan, mix condensed milk, brown sugar, butter and milk. Cook over medium heat until butter is melted, stirring frequently. Increase heat to medium-high; heat to boiling. Boil 5 minutes, stirring constantly.
  3. Pour one-third of the caramel mixture over crackers in pan. Arrange 30 of the crackers over caramel. Top with one-third of the remaining caramel mixture. Repeat with remaining crackers and caramel.
  4. In small microwavable bowl, microwave chocolate chips uncovered on High 1 to 2 minutes, stirring every 30 seconds, until melted and smooth. Pour over caramel; spread evenly. Refrigerate about 1 hour or until set. Cut into 6 rows by 8 rows. Store covered up to 4 days.
Jump to video click here Triple-Layer Cracker Toffee Bars

Famous Brick Street Chocolate Cake


The luscious Brick Street Chocolate Cake is everything you dream of in a chocolate cake. Rich and delicious. The pourable chocolate ganache is over the top decadent! Perfect for the holiday dessert table and so easy to make. This cake is by far the most popular recipe on this website!

This luscious chocolate cake is everything you dream of in a chocolate cake. Rich and delicious. The pourable chocolate ganache is over the top. Bake this in a tube pan, let it cool completely.

Fill the center hole with ganache icing first, then pour the rest over the top, let it cascade down the sides. Yeah. There’s cocoa in that ganache. Cocoa in the cake. Also chocolate pudding and chocolate chips. Chocolate on steroids. If you’re looking for the best chocolate cake recipe, this is by far the best one I’ve made.

INGREDIENTS

Cake:
  • 2 cups sugar
  • 1 cup butter, softened
  • 1 1/2 teaspoons pure vanilla extract
  • 3 large eggs
  • 2 1/2 cups cake flour
  • 1 cup baking cocoa, sifted
  • 2 teaspoons baking soda
  • 1/2 teaspoon salt
  • 1/2 cup instant chocolate pudding mix (small box)
  • 2 1/4 cups buttermilk
  • 1 cup semi-sweet chocolate chips
Chocolate Icing:
  • 1/2 cup water
  • 1/2 cup butter
  • 1 teaspoon vanilla
  • 1 cup baking cocoa, sifted
  • 3 1/2 cups powdered sugar
  • 3 tablespoons heavy cream (more or less for consistency)
INSTRUCTIONS

Cake:
  1. Preheat CONVECTION OVEN ONLY to 350°.
  2. Beat sugar, butter & vanilla in large bowl.
  3. Beat in eggs.
  4. Mix in cake flour, baking cocoa, soda, salt, chocolate pudding mix and buttermilk.
  5. Stir in semi-sweet chocolate chips.
  6. Pour into greased tube pan.
  7. Bake in CONVECTION OVEN ONLY at 350° for 60-70 minutes, until cake tester comes out clean.
  8. Cool cake completely before icing.
Chocolate Icing:
  1. Heat water, butter and vanilla together in sauce pan on stovetop until melted.
  2. Remove from heat.
  3. Stir in one cup cocoa.
  4. Please visit Famous Brick Street Chocolate Cake for full instructions.

Mini Pineapple Upside-Down Cake


Want a taste of the tropics? One of my favorite dishes to make is Mini Pineapple Upside Down Cakes. There’s something about seeing pineapple rings and cherries that make people smile. Making these in a muffin tin is the perfect way to create individual servings for friends and family.

INGREDIENTS

Topping:
  • 1 can pineapple rings
  • 6 maraschino cherries
  • 1/2 stick of butter (4 Tbsp)
  • 2/3 cup brown sugar (packed)
Cake:
  • 2 eggs
  • 2/3 cup sugar
  • 4 Tbsp pineapple juice
  • 2/3 cup all purpose flour
  • 1 tsp baking powder
  • Pinch of salt
INSTRUCTIONS
  • Preheat Oven to 350 degrees.
  • In separate bowls mix your topping and cake batter.
  • Spray muffin tin
  • Pour topping into muffin tin first. Place pineapple ring in and put a cherry in the center
  • Next pour in your cake batter
  • Please visit Mini Pineapple Upside-Down Cake for full instructions.

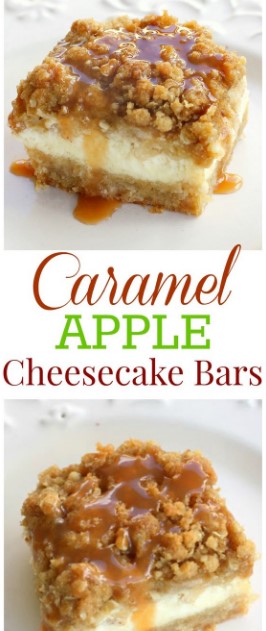
Caramel Apple Cheesecake Bars


These creamy Caramel Apple Cheesecake Bars start with a shortbread crust, a thick cheesecake layer, and are topped with diced cinnamon apples and a sweet streusel topping.

These Caramel Apple Cheesecake Bars have a flaky shortbread crust, a simple cheesecake filling, and has cinnamon apples and a brown sugar streusel on top. Drizzle caramel sauce on top when serving.

You can add the caramel on top of the caramel apple cheesecake bars right before serving or before you chill them. This recipe is always requested any time I bring it anywhere.

You can freeze these caramel apple cheesecake bars. Just like most cheesecakes, this recipe freezes well. Just make sure to save the caramel topping for when serving.

INGREDIENTS

Crust:
  •  2 cups all-purpose flour
  •  1/2 cup firmly packed brown sugar
  •  1 cup 2 sticks butter softened
Cheesecake Filling:
  •  3 8- ounce packages cream cheese softened
  •  3/4 cup sugar , plus 2 tablespoons, divided
  •  3 large eggs
  •  1 1/2 teaspoons vanilla extract
Apples:
  •  3 Granny Smith apples , peeled, cored and finely chopped
  •  1/2 teaspoon ground cinnamon
  •  1/4 teaspoon ground nutmeg
Streusel Topping:
  •  1 cup firmly packed brown sugar
  •  1 cup all-purpose flour
  •  1/2 cup quick cooking oats
  •  1/2 cup 1 stick butter softened
Drizzle:
  •  1/2 cup caramel topping for drizzling after baked
INSTRUCTIONS
  1. Preheat oven to 350 degrees F.
  2. In a medium bowl, combine flour and brown sugar. Cut in butter with a pastry blender (or 2 forks) until mixture is crumbly. Press evenly into a 9x13 baking pan lined with heavy-duty aluminum foil. Bake 15 minutes or until lightly browned.
  3. In a large bowl, beat cream cheese with 3/4 cup sugar in an electric mixer at medium speed until smooth. Then add eggs, 1 at a time, and vanilla. Stir to combine. Pour over warm crust.
  4. In a small bowl, stir together chopped apples, remaining 2 tablespoons sugar, cinnamon, and nutmeg. Spoon evenly over cream cheese mixture.
  5. For the streusel topping: In a small bowl, combine all ingredients. I like to really combine it by using my clean hands to thoroughly combine the butter into the mixture.
  6. Please visit Caramel Apple Cheesecake Bars for full instructions.

Cinnamon Apple Crumb Cake


Are you ready for fall baking? Cinnamon Apple Crumb Cake is the perfect dessert for crisp weather coming up.

A few days ago, answering the phone, I heard my best friend: “Vera, when do you have time for me? I have something very important to tell you! I’ll be there in a few hours. And please, make one of your sweet desserts so we could eat something sweet while talking”. And – click, that was it.

If I had the phone number, I would surely have called Superman because I knew what was coming to me! First, searching on Pinterest. Cheesecake, Cupcakes, Cookies?Nooo, maybe this quick Poke Cake? Hmmm these Apple Muffins look fantastic, too. After an “easy” 45 minutes, the decision was made – Cinnamon Apple Crumb Cake!

INGREDIENTS

For cinnamon streusel crumb:
  • 1 and 1/2 cups flour
  • 1/2 cup brown sugar
  • 1/4 cup granulated sugar
  • 1/2 teaspoon salt
  • 1 teaspoon cinnamon
  • 1/4 teaspoon nutmeg
  • 1/2 cup butter -melted
  • 1/2 teaspoon vanilla
  • 1 large (or 2 small) tart apples-peeled and chopped
For the cake:
  • 4 Tablespoons butter
  • 1/2 cup granulated sugar
  • 1 large egg
  • 1 teaspoon vanilla
  • 1/2 cup sour cream
  • 1 cup flour
  • 1/4 teaspoon baking soda
  • 1/4 teaspoon salt
  • 1/2 teaspoon baking powder
Apple cider glaze:
  • 1/2 cup powdered sugar
  • 1 and 1/2 – 2 Tablespoons apple cider
INSTRUCTIONS
  1. Preheat the oven to 350 F. Grease 8 inch springform pan and line the bottom with parchment paper, set aside.
  2. To make cinnamon streusel crumb, first  in a bowl, whisk together dry ingredient. Then add melted butter and vanilla and stir until the mixture is evenly moist, set aside, too.
  3. To make the cake in a large bowl, cream together 4 tbsp butter with 1/2 cup sugar until light and fluffy, then add egg and beat well. Finally, add vanilla and sour cream and beat again.
  4. In another bowl, stir together 1 cup flour, baking soda, salt, and baking powder and add to the butter mixture, stir until just combined.
  5. Spread half the batter at the bottom of the pan ( it will be very thin layer). Spread the apple chunks evenly over the batter, then sprinkle about 1 cup of the cinnamon streusel crumbs over the apples. Spread the remaining batter over the crumbs and on top spread the rest of the cinnamon streusel.
  6. Please visit Cinnamon Apple Crumb Cake for full instructions

Unbelievably Moist Banana Bread


This Banana Bread is such an easy and delicious breakfast or dessert! It is so moist that this recipe from my mom’s cookbook will be the only recipe you will ever use! 

There are hundreds, if not thousands of Banana bread recipes out there. The tough part is finding the one that is perfect  for you! 

Using simple ingredients and easy instructions, your home will be smelling like all kinds of deliciousness in no time! I’ve also included a few baker’s tips – both from my experience and my mom’s. This way you can can be sure your banana bread will come out perfectly!

INGREDIENTS
  • 2 cups sugar
  • 1 cup soft margarine or butter, (two 1/2 cup sticks of butter)
  • 5 eggs
  • 2 cups flour
  • 6 tbsp buttermilk, (reg milk will work too)
  • 2 tsps baking soda
  • 1-1/2 cups ripe bananas, about 4-5 small
  • 1 cup nuts, chopped (optional)
INSTRUCTIONS
  1. Mix all ingredients together. Let mixture sit for 1 hour in the mixing bowl in room temperature. (Note: Due to banana size, the mixture may not all fit into one loaf pan; do not overflow your pan. Use two loaf pans for the extra batter)
  2. Pour into greased loaf pan(s). Bake 60-65* minutes at 350 degrees. If using a bundt pan, bake for 50-60* minutes at 300 degrees. Ten minutes before final cooking time, check doneness with toothpick. When toothpick comes out clean from middle of the loaf, it is done or when center of loaf is close to 195-200 degrees F. (Note: It's okay to let the crust get very dark if cooked for longer, it is supposed to be and won't hinder the taste).
  3. Please visit Unbelievably Moist Banana Bread for full instructions.

Monday, June 25, 2018

Pumpkin Bread with Brown Butter Maple Icing


Pumpkin bread is one of those warming, comforting carbs that I simply cannot resist. Whether it’s topped with a glaze, studded with nuts, or plain nekkid, I love it any which way and prefer a thick slice for breakfast with my coffee. 

This bread is perfectly fluffy and moist without being too wet, has a soft and tender crumb, and is topped with the best brown butter maple glaze that drips down over the top of this well-spiced loaf.

Perfectly spiced, moist and tender, this Pumpkin Bread will soon become a family favorite! Leave it naked if you wish, or stud it with nuts - however, I prefer mine with this simple brown butter maple glaze. I'm sure you will, too!

INGREDIENTS
  • ½ cup butter, softened (I used Land O Lakes)
  • 1 cup dark brown sugar
  • 1 cup canned pumpkin puree (the puree, NOT pumpkin pie filling!)
  • 2 eggs
  • 1 & ½ tsp ground cinnamon
  • ½ tsp ground ginger
  • ¼ tsp ground nutmeg
  • ¼ tsp ground cloves
  • 1 tsp baking powder
  • 1 tsp baking soda
  • 1 tsp salt
  • 1 & ½ cups all-purpose flour
For Glaze:
  • ½ cup (1 stick) butter
  • 1 - 1 & ½ cups powdered sugar (start with one cup and add more if glaze is too runny)
  • 1-2 Tbsp maple syrup
  • ¼ cup milk, optional if glaze is too thick
INSTRUCTIONS
  1. Preheat oven to 350 degrees F. Liberally grease a 9" loaf pan with cooking spray and set aside.
  2. Meanwhile, in a bowl combine all of the above bread ingredients and beat at medium speed with a handheld mixer, scraping down the sides of the bowl, until well-mixed.
  3. Pour the bread mixture into the prepared pan. Bake for approx. 40-50 minutes or until a toothpick inserted near the center comes out mostly clean or with a couple moist crumbs (not wet). Cool for about 15 minutes, then very gently remove from pan and transfer to a wire rack to cool completely.
  4. While bread cools, make your glaze: in a small saucepan, heat butter over medium-low heat until melted. Continue cooking, watching butter carefully, until it sizzles and begins to turn amber in color, about 4-5 minutes. Do not overcook because it can quickly burn! When butter looks caramel-colored and smells kind of nutty, it's done. Remove butter from heat and cool completely. Then stir in the powdered sugar and maple syrup until a soft glaze has formed.
  5. Please visit Pumpkin Bread with Brown Butter Maple Icing for full instructions.

No Bake Strawberry Icebox Cake


Looking for a quick and easy Spring/Summer dessert recipe? Try out delicious No Bake Strawberry Icebox Cake ! 

When it comes to friendships, I feel blessed to know that I have met some wonderful people over the years – each one unique and special in its own way.

Most of them are the friends I’ve known since childhood – I think these friendships have some special line. There are the friends I made in high school or college, those that spent hours preparing for an exam, playing basketball or running with me. The roommates who were my second family. And of course, there are the friends I’ve made because of this blogging world, who share my passion for cooking and baking, and all things food.

You know that as people get older, they get more stubborn, and so some of my best friends are born stubborn in their refusal to try new things. Can you image the look on their faces when I mentioned that i’m planning to make something with Brussels sprouts or asparagus over the weekend ??  Priceless ...

INGREDIENTS
  • 19 oz graham crackers
  • 2 pounds fresh strawberries
  • 3½ cups heavy cream
  • 1 banana, sliced thin
  • ½ cup powdered sugar
  • 2 tsp vanilla
  • ¼ tsp salt
INSTRUCTIONS
  1. Cream powdered sugar, vanilla, and salt with the heavy cream in the bowl of a stand mixer. Beat until the cream mixture holds stiff peaks.
  2. Spread a thin layer of heavy cream mix in a 9x13 pan just to coat the bottom.
  3. Layer 5 graham crackers across the center of the pan, then 2 more,breaking them as needed to fit around the top and bottom edges.
  4. Spread a thick layer of heavy cream mix over grahams and top with a hearty layer of sliced strawberries.
  5. Place graham crackers on top of strawberries, then heavy cream mix, then layer of thinly sliced bananas.
  6. Repeat the graham-strawberries-cream layers 1 more time (3 times total) and you should reach the top of the pan.
  7. Please visit No Bake Strawberry Icebox Cake for full instructions.

Deep Fried Cookie Dough


It’s battered cookie dough bites fried to a fluffy, golden perfection for a sweet treat that melts in your mouth. This recipe is inspired by the Texas State Fair, where is has appeared several years according to reports.

But the question remains on how to make it at home, since we wouldn’t want to limit our intake to once per year! This dessert is so yummy for Cheat Days, midnight snacks, spring break. Heck, we’ve even made it on Mother’s Day.

We like to serve them warm on a platter stacked in two layers. You can also give them a dusting of powdered sugar and drizzle with chocolate sauce.

This is one of the easier deep fried recipes out there. Simply start with your favorite cookie dough batter, either homemade or store bought.  We used chocolate chip here, but it works for oreo or peanut butter dough too.

INGREDIENTS

Cookie Dough
  • 1/4 cup unsalted butter softened
  • 1/2 cup brown sugar packed
  • 1 large egg
  • 1 teaspoon vanilla
  • 1 cup all-purpose flour
  • 1 cup chocolate chips
Batter and Frying
  • 1 1/4 cups all-purpose flour
  • 1 teaspoon baking powder
  • 1/4 teaspoon salt
  • 1/4 cup granulated sugar
  • 2 teaspoons vegetable oil
  • 1 cup milk
  • 3 cups vegetable oil for frying
Serving - optional
  • 1/4 cup powdered sugar
  • chocolate or caramel sauce
INSTRUCTIONS
  1. Line a medium baking sheet with parchment paper/wax paper, and also line a plate with paper towel. Set both aside.
  2. In a medium bowl, cream together butter, sugar, egg and vanilla. Mix in flour and chocolate chips until blended. 
  3. Form into 1 ½ inch balls and place onto prepared baking sheet.
  4. Freeze the balls for at least 15 minutes while you complete the remaining steps.
  5. In a medium bowl, mix together flour, baking powder, salt and sugar. Add milk and oil and whisk until smooth.
  6. Add 2 inches of oil to a medium saucepan or deep fryer and heat to 375°F.
  7. Please visit Deep Fried Cookie Dough for full instructions.

Chocolate Turtle Apple Slices


Happy Fall y’all! I can’t believe it’s already here. I’m so excited for cooler weather and all the delicious Fall flavors! That brings me to today’s recipe which is made with one of the best fruits of Fall – APPLES! And what’s better than a candied apple!

Have you ever had a candy apple but wished there was a little more “candy” in each bite? Problem solved! These candy apples are covered with all of the ingredients in my favorite candy – chocolate turtles.

And I love that there are just 5 ingredients in this recipe. Keeping it simple is always the best way to go when possible! All you will need to make these Chocolate Turtle Apple Slices is 2 large apples, 3 1/2 cups semi-sweet chocolate chips, 1 tablespoon coconut oil, 1 cup melted caramels and chopped pecans.

INGREDIENTS
  • 2 very large Fuji apples
  • 3 1/2 cups semi-sweet chocolate chips I used Nestle
  • 1 tablespoon coconut oil
  • 1 cup caramels melted (I used Kraft caramels)
  • Chopped pecans
  • Popsicle sticks
INSTRUCTIONS
  1. Slice apples into 1/2" pieces. With a knife make a little slit in the bottom of each apple slice to make it easier to insert a popsicle stick.
  2. Melt chips in the microwave on high for about 2 minutes.* Stir in coconut oil until smooth. Dip apple slices in chocolate and place on parchment lined cookie sheet.
  3. Place caramels in microwave safe bowl and microwave on high for 45-60 seconds.* Do NOT overheat. Stir until smooth. Drizzle melted caramel over chocolate and sprinkle with nuts.
  4. Refrigerate for about 1 hour. Serve and enjoy immediately. Apples are best the first day. Store in refrigerator.
  5. Please visit Chocolate Turtle Apple Slices for full instructions.

Tuesday, June 12, 2018

Baked Cinnamon Cream Cheese Roll-Ups


This Baked Cinnamon Cream Cheese Roll-Ups recipe is a simple process that yields an amazing churro-like breakfast treat. 20 minutes in the oven (if you can wait that long) to dig in to these! 

Can you believe I actually had to convince my children to try these? They’re deeply suspicious of all new foods (ugh), and were skeptical when I said brightly “they’re really good!! Try one!”.

I think they’re onto me, because I also said that about asparagus a few weeks ago, and they did try it. And hated it. I guess I kind of deserved that one. Anyway – the cinnamon-y deliciousness of these Cinnamon Cream Cheese Roll-Ups hit their nostrils, and they deigned to taste it.

INGREDIENTS
  • 10-12 slices bread (any kind)
  • 4 oz cream cheese , softened
  • 3 Tbs powdered sugar
  • ½ cup sugar
  • 1 tsp cinnamon
  • ½ cup butter , melted
INSTRUCTIONS
  1. Preheat the oven to 350F.
  2. Slice the crusts off the bread
  3. Using a rolling pin, flatten the bread out.
  4. Combine the cream cheese and powdered sugar until smooth.
  5. Lay out 2 shallow dishes (I use pie plates sometimes)
  6. Combine the sugar and cinnamon until well combined and add to one of the shallow dishes.
  7. In the other, add the melted butter.
  8. Spread each slice of bread thickly with the cream cheese mixture.
  9. Please visit Baked Cinnamon Cream Cheese Roll-Ups for full instructions.

Chewy Coconut Cookies


Super soft & chewy coconut cookies. With a slight hint of caramel – these delicate cookies are so simple and delicious. These cookies get their delicious caramel-like taste and chewiness from using brown sugar and honey. The coconut gives a great texture, and then slightly underbaking makes them super soft.

My only final advice for these cookies is about keeping them thin without burning. Because the batter is soft and the cookies are meant to spread, drop the dough onto your prepared cookie sheet in balls no bigger than 1 tablespoon.  Make sure the cookies are placed at least 2 inches apart so that they don’t spread into each other. And finally, under bake. Under baking keeps them oh so soft.

Seriously, these coconut cookies are deliciously soft, chewy and amazing. I can eat about 5 in one sitting and I recommend that you do too!

INGREDIENTS
  • 1/2 cup unsalted butter , softened to room temperature
  • 2/3 cup packed brown sugar
  • 1/4 cup granulated sugar
  • 1 tablespoon honey
  • 1/2 teaspoon vanilla
  • 1 large egg , room temperature
  • 1 and 1/3 cup all purpose flour
  • 1/2 teaspoon baking soda
  • 1/4 teaspoon salt
  • 1 and 1/3 cups sweetened shredded coconut
  • 2 teaspoons boiling water
INSTRUCTIONS
  1. Preheat the oven to 350F degrees. 
  2. Line baking sheets with parchment paper or a silicone baking mat.
  3. In a large bowl beat the butter, sugars & honey together until light and fluffy. Add in the egg and vanilla and continue mixing.
  4. In a separate medium sized bowl, whisk together the flour, baking soda and salt. 
  5. Add the flour mixture to the butter mixture and beat on low to low-medium speed until almost combined. Then beat in the boiling water and coconut.
  6. Drop the cookie dough into small balls (slightly under a tablespoon) on your prepared cookie sheet 3 inches apart. 
  7. Please visit Chewy Coconut Cookies for full instructions.

Quinoa Stuffed Bell Peppers


Loaded with protein, veggies and healthy grains, these stuffed bell peppers will provide the nutrition that you need for a healthy, balanced meal! Stuffed bell peppers have been on my bucket list for at least a year and I’m so glad to finally cross it off my list.

Using leftover ingredients, I created a southwest quinoa mixture loaded with corn, beans, tomatoes, green chilis for a bit of heat and cheesy pepper-jack-feta goodness. It’s incredibly filling and hearty, making it the perfect vegetarian option for Meatless Monday or any other day of the week!

INGREDIENTS
  • 3 cups cooked quinoa
  • 1 (4-ounce) can green chiles
  • 1 cup corn kernels
  • 1/2 cup canned black beans, drained and rinsed
  • 1/2 cup petite diced tomatoes
  • 1/2 cup shredded pepper jack cheese
  • 1/4 cup crumbled feta cheese
  • 3 tablespoons chopped fresh cilantro leaves
  • 1 teaspoon cumin
  • 1 teaspoon garlic powder
  • 1/2 teaspoon onion powder
  • 1/2 teaspoon chili powder, or more to taste
  • Kosher salt and freshly ground black pepper, to taste
  • 6 bell peppers, tops cut, stemmed and seeded
INSTRUCTIONS
  1. Preheat oven to 350 degrees F. Line a 9×13 baking dish with parchment paper.
  2. In a large bowl, combine quinoa, green chiles, corn, beans, tomatoes, cheeses, cilantro, cumin, garlic, onion and chili powder, salt and pepper, to taste.
  3. Spoon the filling into each bell pepper cavity. Place on prepared baking dish, cavity side up, and bake until the peppers are tender and the filling is heated through, about 25-30 minutes.
  4. Please visit Quinoa Stuffed Bell Peppers for full instructions.

Copycat Levain Bakery Dark Chocolate Chocolate Chip Cookies


These decadent double chocolate chip cookies are thick, soft, and rich. They taste very close to the dark chocolate chocolate chip cookies from Levain Bakery in New York City.

There are many copycat recipes out there. After trying a few, this one is the one I found most promising and incorporated many techniques I suspected when analyzing the cookies. When the cookies are first baked, they are thick, crispy on the outside, with a still-soft center, and a light crumb. They stay so for a few hours, but eventually they did lose the crispy exterior and the crumb became denser. The ones I had from Levain Bakery managed to maintain that just-baked texture almost a full day. So I’m still not quite sure how Levain Bakery does it.

INGREDIENTS
  • 1 cup unsalted cold butter, cut into small cubes
  • 1 cup packed light brown sugar
  • ½ cup graulated white sugar
  • 2 large eggs
  • ½ cup dark unsweetened cocoa powder (try to use a premium brand for richer flavor)
  • 1 cup cake flour
  • 1½ cup all-purpose flour
  • 1 teaspoon cornstarch
  • ¾ teaspoon baking soda
  • ½ teaspoon salt
  • 1 cup semisweet chocolate chunks or roughly chopped chocolate
  • 1/2 cup semisweet chocolate chips
INSTRUCTIONS
  1. Preheat oven to 410 F.
  2. In a mixing bowl of a stand mixer, cream together butter and sugars on high speed until light and fluffy (about 3-4 minutes). Add eggs one at a time, mixing well after each addition.
  3. Add in cocoa, cake flour, all-purpose flour, cornstarch, baking soda, and salt and set mixer on lowest speed setting to stir until dough is just combined (please note in the video the mixing is sped up to keep the video short). You want the dough to be smooth and uniform in color, but you don't want to overmix it. Stir in chocolate chunks.
  4. Place the dough in the fridge for 15 minutes to chill.
  5. Line two baking sheets with silicone baking mats. Measure out about 4.3 oz of dough and roll into a ball. Place several chocolate chips on top and adjust chips until the dough weighs 4.5 oz. Place dough ball onto baking sheet. You will place four on each baking sheet, spaced about 2 inches apart. You should have enough dough to make 8 cookies, but it is best to weigh the balls so that they are all the same size and will cook evenly.
  6. Please visit Copycat Levain Bakery Dark Chocolate Chocolate Chip Cookies for full instructions.

Monday, June 11, 2018

No-Bake Chocolate Oat Bars


Just because you’re tired of all that holiday cooking and baking doesn’t mean you’re tired of sweet treats! And trying to back away from the sugary sweets doesn’t mean you have to go cold-turkey on dessert, either. The perfect answer to both dilemmas? Our No-Bake Chocolate Oat Bars!

Now, we won’t claim that these bars are some sort of health treat, but you can feel better about eating them than you did all those cookies and trifles from Christmas. The oats give them a delicious crunch, and the chocolate drizzle gives them the perfect amount of sweetness. Even better? All you need to do is mix them up, stick them in the fridge, and enjoy. Let us demonstrate this simple sweet, then read on for the full recipe so you can try them yourself.

INGREDIENTS
  • 1 cup butter
  • ½ cup brown sugar, packed
  • 1 teaspoon pure vanilla extract
  • 3 cups rolled oats
  • ½ teaspoon ground cinnamon
  • ¼ teaspoon kosher salt
  • 1 cup dark chocolate chips
  • ¾ cup chunky peanut butter
INSTRUCTIONS
  1. Line a 8-inch-by-8-inch baking dish with parchment paper, and set aside.
  2. In a medium saucepan, combine the butter, brown sugar and vanilla extract. Heat over low-heat, until the butter has melted and the sugar has dissolved.
  3. Add the oats, cinnamon and kosher salt. Cook, stirring constantly, for 4 to 5 minutes.
  4. Pour half of the oat mixture into the prepared baking dish. Spread out the mixture evenly, pressing down.
  5. In a small microwave-safe bowl, combine the chocolate chips and the peanut butter. Heat on high in the microwave, in increments of 40 seconds, stirring in between each increment, until melted and fully combined.
  6. Please visit No-Bake Chocolate Oat Bars for full instructions.

Rainbow Vegetarian Pad Thai with Peanuts and Basil


Fast and easy? Adaptable? Simple? Delicious? That’s this vegetarian pad thai. Let’s talk about how to make this Pad Thai, because it’s so easy. More like I’ll show you with pictures because I talk too much, always.

One thing I should note real quick that the really fun thing about this recipe is spiralizing the veggies. You don’t need-need-need a spiralizer – you can use a peeler or just cut the veggies into thin strips – but man oh man, that thing is fun to use.

And with a swirl of the spiralizer, a shake of the sauce jar, and tong-toss of the noodles in the pan, you’ve got yourself one YUMMMMMY plate of Rainbow Vegetarian Pad Thai.

INGREDIENTS
  • 4 ounces brown rice noodles (you can get stir-fry type noodles or Pad Thai noodles – and usually that’s half a box)
  • 1 zucchini
  • 1 red pepper
  • half a yellow onion
  • 2 carrots
  • 2 tablespoons oil
  • 1 egg, beaten
  • 1/2 cup peanuts, chopped
  • 1/2 cup fresh herbs like cilantro, green onions, and basil, chopped
For the sauce : 
  1. 3 tablespoons fish sauce or vegan fish sauce substitute
  2. 3 tablespoons brown sugar (or sub another sweetener)
  3. 3 tablespoons chicken or vegetable broth
  4. 2 tablespoons white vinegar
  5. 1 tablespoon soy sauce
  6. 1 teaspoon chili paste (sambal oelek)
INSTRUCTIONS
  1. Place the uncooked noodles in a bowl of cold water to soak.
  2. Spiralize the zucchini, red pepper, and onion into noodle-like shapes. Cut the carrots into very small pieces (or spiralize them, too, if they’re big enough).
  3. Shake up the sauce ingredients in a jar.
  4. Heat a tablespoon of oil over medium high heat. Add the veggies – stir fry with tongs for 2-3 minutes or until tender-crisp (if they are not spiralized, they might need longer). Be careful not to overcook them – they’ll get soggy and heavy. Transfer to a dish and set aside.
  5. Please visit Rainbow Vegetarian Pad Thai with Peanuts and Basil for full instructions.

Peanut Butter Oatmeal Chocolate Chip Cookies


Thick, chewy peanut butter oatmeal chocolate chip cookies! These gluten free, flourless peanut butter cookies are made with 7 simple ingredients and are full of peanut butter flavor!

Remember these flourless peanut butter oatmeal chocolate chip cookies? I first made them back in 2013 and slowly but surely they took over Pinterest and won your hearts. Now they’re one of my most popular recipes.

So say hi to my ridiculously good-looking, chewy, thick, fat peanut butter oatmeal chocolate chip cookies. Without flour or butter!

INGREDIENTS
  • 1 cup natural creamy peanut butter (just peanuts + salt)
  • 2/3 cup packed dark brown sugar
  • 1 teaspoon vanilla extract
  • 2 large eggs
  • 3/4 cup rolled oats (gluten-free if desired)
  • 1/2 teaspoon baking soda
  • 2/3 cup chocolate chips, dairy free if desired
  • Flakey sea salt for sprinkling on top
INSTRUCTIONS
  1. Preheat oven to 350 degrees F. Line a baking sheet with parchment paper.
  2. In small bowl mix together the oats and baking soda; set aside.
  3. In a large bowl mix together peanut butter, brown sugar, eggs and vanilla until smooth. Mix in dry ingredients with a wooden spoon, then gently fold in chocolate chips.
  4. Roll cookies into 2-inch dough balls and place 2 inches apart on the prepared baking sheet. BARELY flatten the top of the cookie with your hand. The dough should be pretty sticky so if you find this method annoying, simply use a cookie scoop to drop the cookie dough onto the prepared baking sheet. The cookies may not be as round in shape and perhaps a bit thicker, but that's okay, they will still be delicious!
  5. Please visit Peanut Butter Oatmeal Chocolate Chip Cookies for full instructions.

Southwest Tortellini Pasta Salad


A fresh and easy southwest tortellini pasta salad that can be made in less than 30 minutes! It’s loaded with veggies and protein and coated in a deliciously simple and healthy southwest dressing. 

This is one of the healthier meals I like to feed my kids. They LOVE it, and I love that it’s loaded with veggies and good protein from the beans. The dressing is pretty mild–definitely not too spicy for my family. If you do want to add a little “heat” to the dressing you could add some Valentina hot sauce.

INGREDIENTS
  • 20 oz package three cheese refrigerated tortellini
  • 1 cup corn fresh from 1 ear of cooked corn, canned or frozen corn
  • 1 can black beans rinsed and drained
  • 1 red bell pepper chopped
  • 1 avocado chopped
  • 1 1/2 cups cherry tomatoes halved
  • 1/4 cup chopped red onion
  • 1/4 cup chopped fresh cilantro
Dressing:
  • 3 Tbsp olive oil
  • Juice from 2 fresh limes
  • 2 Tbsp rice vinegar
  • 1 clove garlic minced
  • 1 tsp EACH sugar, chili powder, cumin
  • salt and pepper to taste
INSTRUCTIONS
  1. Cook the tortellini according to package instructions. Drain and rinse with cold water.
  2. Add tortellini to a large bowl. Add cooked corn, black beans, bell pepper, avocado, cherry tomatoes, onion, and cilantro.
  3. Combine all of the dressing ingredients in a resealable jar. Shake until combined. Pour desired amount of dressing (you may not want to use it all) over the pasta and toss to coat.
  4. Please visit Southwest Tortellini Pasta Salad for full instructions.

Classic Chocolate Chip Cookies


This is the recipe you’ve been looking for for those perfect classic chocolate chip cookies!  

You know the chocolate chip cookies I’m talking about… the perfect texture… soft but you can sink your teeth into them.  A slight crisp on the edges (but not too much).  Not puffy.  Not flat.  Basically perfection in a cookie and what dreams full of chocolate chip cookies are made of.

So here is the recipe!  Maybe it’s the one your mom used to make?  Try it and see!

INGREDIENTS
  • 1 cup (two sticks) butter, softened
  • 3/4 cup sugar
  • 3/4 cup packed brown sugar
  • 1 tsp. vanilla
  • 2 eggs
  • 2 1/4 cups flour
  • 1 tsp. baking soda
  • 1/2 tsp. salt
  • 2 cups (12 oz. pkg) chocolate chips (I like milk chocolate)
  • 1 cup chopped nuts (optional... and I always opt NO- ha!)
INSTRUCTIONS
  1. Preheat oven to 375 degrees.
  2. Cream butter, sugar, brown sugar and vanilla.
  3. Add eggs and beat well.
  4. Stir together flour, baking soda and salt in separate bowl and then add gradually to butter mixture.
  5. Beat together well.
  6. Stir in chocolate chips (and nuts, if you so desire).
  7. Please visit Classic Chocolate Chip Cookies for full instructions.

Cheesy Garlic Parmesan Spinach Spaghetti Squash


Aiming to eat more veggies? This Cheesy Garlic Parmesan Spinach Spaghetti Squash recipe packs an entire package of spinach swirled with an easy cheesy cream sauce.

Mouthful of a title. Mouthful of deliciousness! Okay that was excessively cheesy, even for me! My apologies. Please forgive me and make this easy cheesy stuffed squash the second you step foot in the kitchen. Pretty please? With Parmesan on top!

INGREDIENTS
  • 1 medium spaghetti squash
  • 2.5 TBSP minced garlic
  • 1 tsp olive or avocado oil
  • 5 oz fresh spinach, chopped
  • 1/2 cup cream
  • 1 TBSP cream cheese (optional but deeeelish!)
  • 1/2 cup freshly grated parmesan cheese, plus extra for topping
  • salt and pepper, to taste
  • grated or sliced mozzarella for topping, to taste
INSTRUCTIONS
  1. Pre-heat oven to 400 degrees F.
  2. Slice your spaghetti squash in half lengthwise and scoop out the seeds.
  3. For easy cutting, feel free to stick your squash in the microwave to soften it up just a tad. Pierce it a few times with a knife (to help vent so it doesn't burst) and cook for for 3-5 minutes. The knife slides through way easier this way! Smaller squash will need about 3 minutes while larger ones will be good to go at 4-5 min.
  4. Next grab a lipped baking sheet or a rimmed baking dish.
  5. Rub the cut side of the squash with a teeny bit of olive oil and place on your baking dish/sheet and roast face-down for about 40 minutes, or until tender and easily pierced with a fork. Cooking time will vary a bit depending on the size of your squash, and larger squash will need to roast a bit longer to tenderize. Once ready, the once rock-hard exterior of the squash will be visibly softened with a tender interior.
  6. Please visit Cheesy Garlic Parmesan Spinach Spaghetti Squash for full instructions.